Taking care of and fixing your lawnmower can guarantee excellent functionality and increase its longevity. Within this manual, we will provide a comprehensive explanation of how to identify and resolve common problems, dismantle and fix damaged components, and put the lawnmower back together.
In addition, we will offer suggestions on how to maintain and protect your Honda lawnmower so that it remains in excellent condition. This guide is suitable for both novice and skilled DIY enthusiasts, providing you with the knowledge and assurance needed to successfully repair your lawnmower. Now, let’s begin and restore your lawnmower to its optimal performance!
Preparing for the Repair
Before starting the repair process, it is essential to gather all the necessary tools and equipment. This will ensure that you have everything you need within reach while working on your Honda self-propelled lawnmower.
Some of the common tools and equipment you might need include a socket set, screwdrivers, pliers, a wrench, a spark plug wrench, and a clean cloth for wiping surfaces.
Furthermore, it is vital to engage in safety measures prior to commencing the repair task. This entails equipping oneself with protective attire, like gloves and safety goggles, while also ensuring that the lawnmower is switched off and the spark plug is disconnected. Adhering to these instructions will guarantee a secure and effective repair procedure.
Gathering necessary tools and equipment
To start the repair process for your Honda self-propelled lawnmower, it is essential to gather all the necessary tools and equipment. Having these items ready will save you time and ensure a smooth repair process. Here are some of the tools you may need:
- Socket set: This will be useful for removing and tightening bolts and nuts.
- Screwdrivers: Different sizes and types of screwdrivers may be required for various parts of the lawnmower.
- Pliers: These will come in handy for gripping and twisting parts, such as wires or connectors.
- Wrench: A wrench will be needed to loosen and tighten certain components.
- Spark plug wrench: This specialized tool is necessary for removing and installing the spark plug.
- Clean cloth: Keep a clean cloth nearby to wipe surfaces and prevent debris from entering the lawnmower.
By having all these tools and equipment ready before you start the repair, you can efficiently diagnose and fix any issues with your Honda self-propelled lawnmower.
Safety precautions and preparation before starting the repair
Before diving into the repair process for your Honda self-propelled lawnmower, it is crucial to take some safety precautions and prepare yourself adequately. Here are some essential steps to follow:
- Disconnect the spark plug wire to prevent accidental starts.
- Place the lawnmower on a flat, stable surface to ensure stability during the repair.
- Put on protective gloves and safety goggles to protect your hands and eyes from any potential hazards.
- Read the user manual or consult online resources to familiarize yourself with the lawnmower’s parts and their functions.
- Clear the work area of any debris, obstacles, or flammable materials that could cause accidents or interference during the repair.
By taking these safety precautions and preparing yourself adequately, you can approach the repair process with confidence and minimize the risk of injury or damage.
Identifying the Problem
To begin the repair process for your Honda self-propelled lawnmower, it is essential to identify the problem you are facing.
Some common issues that Honda lawnmowers may encounter include engine starting problems, uneven cutting, loss of power, or difficulty propelling. To accurately diagnose the problem, you can start by checking the fuel level, air filter, spark plug, and blade condition.
Additionally, inspect the wheels and drive system for any signs of damage or wear. Taking the time to identify the specific problem will help you determine which parts or components may need to be repaired or replaced.
Common issues with Honda self-propelled lawnmowers
Honda self-propelled lawnmowers may encounter common issues that can affect their performance.
Some of these issues include engine starting problems, uneven cutting, loss of power, or difficulty propelling. These problems can be caused by various factors such as clogged fuel lines, dirty air filters, a worn-out spark plug, or a dull blade.
Additionally, issues with the wheels or drive system can also impact the mower’s ability to move smoothly.
By identifying these common issues, you can take the necessary steps to troubleshoot and repair your Honda lawnmower to ensure optimal performance.
Troubleshooting and diagnosing the specific problem
When troubleshooting and diagnosing the specific problem with your Honda self-propelled lawnmower, it’s important to start by observing the symptoms and analyzing potential causes.
For example, if your lawnmower is not starting, check the fuel line for any clogs or fuel flow issues. If the cutting is uneven, inspect the blade for sharpness or damage.
Loss of power could indicate a dirty air filter or a worn-out spark plug.
Difficulty propelling could be due to issues with the wheels or the drive system. By thoroughly examining the mower and identifying the specific problem, you can proceed with the appropriate repairs.
Repairing the Lawnmower
To repair your Honda self-propelled lawnmower, you will need to follow these step-by-step instructions.
First, carefully disassemble the lawnmower, taking note of the specific parts and components that need repair or replacement. Fix any issues with the engine, fuel line, wheels, or drive system, depending on the problem you identified earlier.
If any parts need replacing, be sure to use genuine Honda parts for optimal performance. Once the repairs are done, reassemble the lawnmower following the guidelines provided.
Finally, before completing the repair, test the lawnmower to ensure that it is functioning properly and meets your expectations.
Step-by-step instructions for disassembling the lawnmower
When disassembling your Honda self-propelled lawnmower for repair, follow these step-by-step instructions:
- Remove the spark plug wire to prevent accidental starting.
- Empty the fuel tank, either by running the engine until it is empty or using a siphon or fuel transfer pump.
- Locate and remove any necessary screws or bolts holding the engine cover in place. Use a screwdriver or socket wrench for this step.
- Carefully lift off the engine cover and set it aside.
- Disconnect the throttle cable or linkage from the carburetor.
- Remove the air filter cover and air filter element.
- Unscrew the fuel tank cap and disconnect the fuel line from the carburetor.
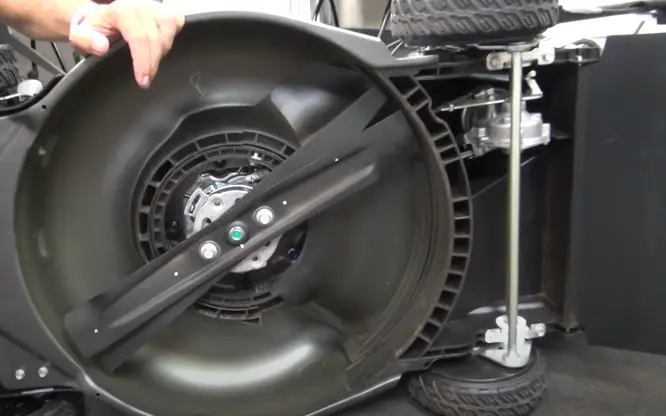
- If necessary, remove the cutting blade by removing the blade bolt and any necessary blade adapter.
- Take note of any additional components or parts that need to be removed for repair or replacement.
- Keep track of the screws, bolts, and other fasteners as you remove them, organizing them in separate containers or labeling them to avoid confusion during reassembly.
By following these steps, you can safely and efficiently disassemble your Honda self-propelled lawnmower for repair.
Repairing and replacing faulty parts or components
Once you have successfully disassembled your Honda self-propelled lawnmower, it’s time to identify and repair or replace any faulty parts or components.
Start by inspecting the engine, carburetor, and fuel system for any signs of damage or wear. Clean or replace the spark plug if necessary. Check the throttle cable or linkage and replace it if it’s worn or damaged.
Examine the cutting blade for any signs of wear or damage and replace it if needed.
Additionally, inspect the air filter and replace it if it’s dirty or clogged. Ensure that you have the correct replacement parts on hand and follow the manufacturer’s instructions for installation.
Reassembling and Testing
After successfully repairing or replacing any faulty parts or components, it’s time to reassemble your Honda self-propelled lawnmower. Follow these guidelines to ensure a proper reassembly:
- Refer to any notes or pictures taken during the disassembly process to assist with reassembly.
- Reattach and secure all previously removed parts and components, following the reverse order of disassembly.
- Use the appropriate tools and techniques to tighten all bolts and screws securely, but be careful not to overtighten.
- Double-check all connections and ensure they are properly seated and aligned.
- Install the cutting blade and tighten the bolt securely.
Once reassembled, it’s essential to test the lawnmower to ensure its proper functionality:
- Fill the fuel tank with fresh gasoline and check for any leaks.
- Start the lawnmower and listen for any unusual sounds or vibrations.
- Check the self-propelled feature by engaging and disengaging it.
- Ensure that the cutting blade spins smoothly and that the throttle responds correctly.
If everything is functioning as expected, congrats on successfully repairing your Honda self-propelled lawnmower! If you encounter any issues during testing, refer back to the Troubleshooting section or consider seeking professional assistance.
Guidelines for reassembling the lawnmower after the repair
Once you have successfully repaired or replaced any faulty parts or components, it is important to follow these guidelines for reassembling your Honda self-propelled lawnmower.
- Refer to any notes or pictures taken during the disassembly process to assist with reassembly.
- Reattach and secure all previously removed parts and components, following the reverse order of disassembly.
- Use the appropriate tools and techniques to tighten all bolts and screws securely, but be careful not to overtighten.
- Double-check all connections and ensure they are properly seated and aligned.
- Install the cutting blade and tighten the bolt securely.
By following these guidelines, you can ensure a proper reassembly of your Honda self-propelled lawnmower.
Testing the lawnmower to ensure proper functionality
Once you have reassembled your Honda self-propelled lawnmower, it is crucial to test it to ensure its proper functionality. Follow these steps to conduct a thorough testing:
- Check the fuel and oil levels. Make sure the fuel tank is filled with fresh gasoline and the oil level is within the recommended range.
- Start the lawnmower by pulling the starter cord or pressing the electric start button.
- Observe the operation of the self-propelled feature. Check if the wheels are engaging and propelling the lawnmower forward at the desired speed.
- Let the lawnmower run for a few minutes and listen for any unusual noises or vibrations.
- Engage the cutting blade and ensure it spins smoothly without any wobbling or irregular movements.
- Push the lawnmower over grass or a designated testing area to assess its cutting performance and maneuverability.
- Pay attention to how the lawnmower handles obstacles, such as tall grass or uneven terrain.
If you notice any issues during the testing, refer back to the troubleshooting section to identify and resolve the problem. By thoroughly testing the lawnmower, you can ensure it is operating correctly and ready for use.
Maintenance Tips and Preventive Measures
To keep your Honda self-propelled lawnmower in optimal condition and prevent future problems, here are some maintenance tips and preventive measures to follow:
- Regularly clean and inspect the lawnmower to remove grass clippings, debris, and dirt that can interfere with its performance.
- Check and replace the air filter at least once a year to ensure proper airflow and prevent damage to the engine.
- Keep the blades sharp and balanced by sharpening them regularly or replacing them when necessary. Dull blades can lead to uneven cutting and strain the engine.
- Change the oil as recommended by the manufacturer to maintain engine lubrication and prevent excessive wear.
- Keep the fuel tank clean and use fresh gasoline to prevent fuel-related issues such as clogging or engine damage.
- Lubricate moving parts, such as wheel axles and cables, to reduce friction and ensure smooth operation.
- Store the lawnmower in a cool, dry place to protect it from moisture and rust.
- Follow the manufacturer’s guidelines for winter storage to prevent fuel deterioration and ensure an easy start-up in the spring.
By following these maintenance tips and preventive measures, you can extend the lifespan of your Honda self-propelled lawnmower and enjoy its efficient operation for many years.
Tips for maintaining the Honda self-propelled lawnmower for future use
Regular maintenance is essential to keep your Honda self-propelled lawnmower performing at its best. Here are some tips to maintain your lawnmower for future use:
- Regularly clean and inspect the lawnmower to remove grass clippings, debris, and dirt that can interfere with its performance.
- Check and replace the air filter at least once a year to ensure proper airflow and prevent damage to the engine.
- Keep the blades sharp and balanced by sharpening them regularly or replacing them when necessary.
- Change the oil as recommended to maintain engine lubrication and prevent excessive wear.
- Keep the fuel tank clean and use fresh gasoline to prevent fuel-related issues.
- Lubricate moving parts to reduce friction and ensure smooth operation.
- Store the lawnmower in a cool, dry place to protect it from moisture and rust.
- Follow the manufacturer’s guidelines for winter storage to prevent fuel deterioration and ensure an easy start-up in the spring.
By following these tips, you can extend the lifespan of your Honda self-propelled lawnmower and enjoy its efficient operation for many years.
Preventive measures to avoid common issues and prolong the lifespan of the lawnmower
To avoid common issues and extend the lifespan of your Honda self-propelled lawnmower, there are several preventive measures you can take:
- Regularly clean the lawnmower to remove grass clippings, dirt, and debris that can clog the blades and hinder its performance.
- Keep the blades sharp and balanced by sharpening them at the start of each mowing season. This ensures clean cuts and prevents strain on the engine.
- Change the oil regularly as recommended by the manufacturer to maintain proper lubrication and prevent engine damage.
- Use fresh fuel and store the lawnmower with an empty fuel tank during the offseason to prevent fuel deterioration and carburetor issues.
- Check and replace the air filter annually to ensure proper airflow and prevent debris from entering the engine.
By following these preventive measures, you can keep your Honda self-propelled lawnmower running smoothly and efficiently for years to come.