Once you’ve configured the e-mail for use on your iPhone, you can immediately start sending out and getting e-mails utilizing the native Mail app.
Setting up your school e-mail on your iPhone helps to guarantee that you have access to essential messages whether you’re on campus or not. Benefit from the Mail, Contacts, Calendars area in your iPhone’s Settings app to establish a school e-mail.
Setting Up School Email on iPhone
The following actions need to be taken in order to customize your iPhone:
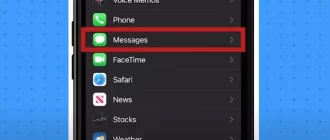
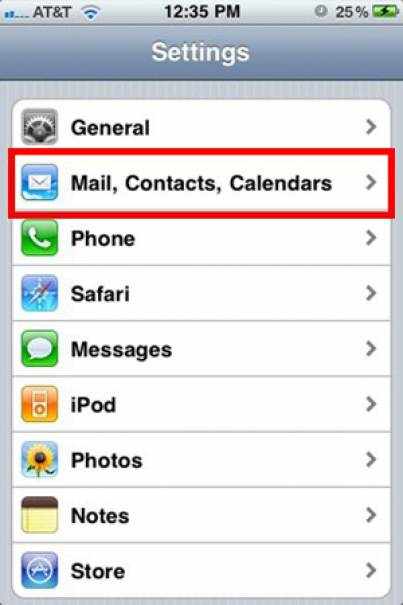
- Launch the Settings application on your iPhone and choose Mail, Contacts, or Calendars from the list of options. It is possible that you may need to scroll down the page in order to locate this menu option.
- Select Add Account from the menu that appears under the Accounts title.
- Choose “Other” for the kind of email account you want to use.
- Under the Mail header, choose the Add Mail Account option.
- Please enter your login details for your school’s email account. The information that you provide here is unique to your university. To get this information, either visit the website of your institution or contact the person in charge of its network administration. You will need your own personal school email account, username, and password, in addition to the incoming and outgoing mail server information for your school, in order to send and receive email from your iPhone while you are at school.
- The vast majority of postsecondary educational institutions make this information available online since it is such a common need for students to be able to access their email from a mobile device.
- Visit the page on Apple’s website titled “Mail Settings You Might Need From Your Email Service provider” for a list of typical mail settings that you might need to get into depending on the configuration of the e-mail server at your school.
- Tap the Next button, and then follow the on-screen instructions to fill out the demand information. On the last page, your iPhone will try to validate your settings to ensure that you have entered all of the necessary information. In the event that everything is in order, the primary Mail page will load, and you will see that your school email address has been added to the Accounts section. To begin using your school email, go back to the home screen and open the Mail app on your device.
Change settings for your email
After you have actually established your school e-mail account, spend a few moments to modify how it sends and receives messages by customizing the settings. Using the Settings app, navigate to Mail, Contacts, and Calendars. Select your school e-mail account from the list of Accounts to make adjustments to its settings. These adjustments can include how frequently your iPhone checks for new e-mail on the server maintained by your school and how far back in time copies of messages are saved on the device. In order to avoid using up an excessive amount of space on the device, for instance, you can decide to save just the last two weeks’ worth of e-mails on it.
Alternative email app
Mail is the default email management program that comes installed on iPhones, but it is by no means the only one accessible. If you don’t like the Mail app that comes pre-installed on your iPhone, you may download a variety of other options from the App Store, many of which are available at no cost. The process of establishing your school account in one of these apps may vary, but the information you need to get from your school in order to build your account will remain consistent regardless of which app you choose.